
How To Make a Simple and Inexpensive Jingle Bell Garland DIY
Th3
There are two kinds of holiday decorators: the ones who casually toss a $50 garland into
their cart and the rest of us who quietly whisper, “I can DIY that for way less.” If
you’re in the second group, welcomeyou’re among friends.
A jingle bell garland is one of those deceptively simple decorations that looks
high-end, sounds downright festive, and costs surprisingly little to make. In fact,
many store-bought metal or brass bell garlands are in the $20–$50 range, while
DIY-ers regularly recreate nearly identical looks for a fraction of the price using
basic craft-store bells and simple string or wire.
In this guide, inspired by the cozy, practical spirit of Hometalk DIY projects, you’ll
learn how to make a simple and inexpensive jingle bell garland from scratch. We’ll go
over materials, step-by-step instructions, styling ideas, storage tips, and real-life
experiences from crafters who’ve turned a handful of bells into seriously charming
holiday decor.
Why Make Your Own Jingle Bell Garland?
Before we dive into the how-to, let’s talk about the why. DIY jingle bell garlands are
popular for a few very good reasons:
-
They’re budget-friendly. One blogger recreated a high-end gold bell
garland for about $16.50 in materials, compared with a similar version for over
$50 in a retail store. -
They’re endlessly customizable. You can go rustic with jute and
antique-finish bells, minimal with matte silver, or glam with shiny brass and velvet
ribbon. -
They’re surprisingly simple. Most tutorials follow the same formula:
cut your string or wire, thread the bells, knot or twist to secure, hang, and admire. -
They last for years. Unlike greenery garlands that dry out or popcorn
strands that… attract critters, metal jingle bells hold up season after season with
minimal care.
The best part? You get that irresistible jingle-jingle every time the heat
kicks on, someone walks by, or the cat decides to investigate your design choices.
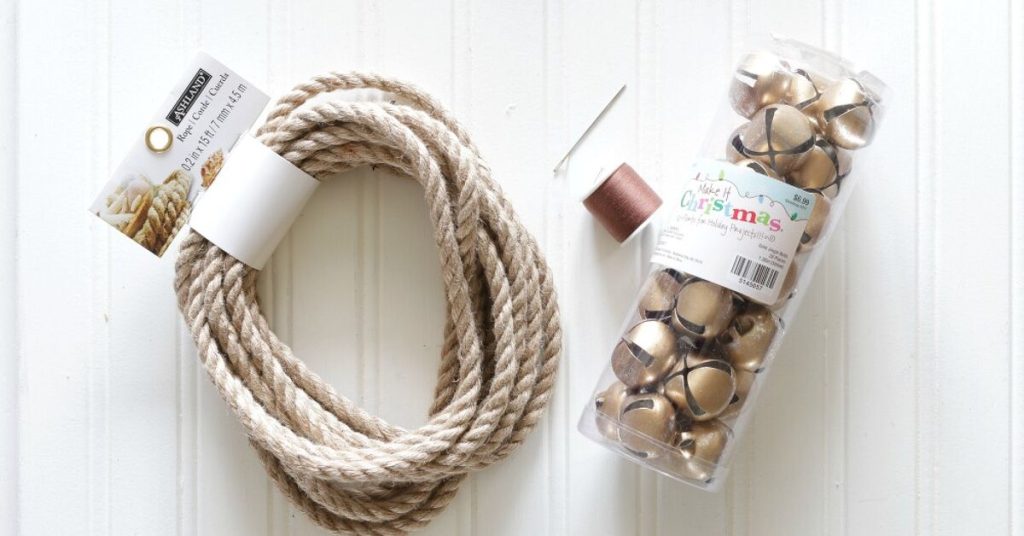
Supplies You’ll Need for a Simple Jingle Bell Garland
Exact materials vary across tutorials, but most makers use some version of the same
basic supply list. Here’s a simple, Hometalk-style setup that’s easy to tweak.
Core Materials
-
Jingle bells in your chosen size and finish (metal, brass, gold,
silver, red, or mixed). Look for bells with a loop or hole at the top for threading. -
String, twine, or ribbon – options include cotton baker’s twine,
jute, leather cord, or velvet ribbon for a more luxe look. -
Scissors or wire cutters – depending on whether you use string or
wire. -
Optional floral wire or craft wire if you want a more structured
garland that holds its shape.
Nice-to-Have Extras
- Velvet or grosgrain ribbon for bow accents on the ends
- Greenery picks or faux cedar garland to layer behind the bells
- Command hooks or clear light clips for hanging over mantels or windows
- Cardboard scrap for tangle-free storage later
You can find bells and basic supplies at dollar stores, craft chains, or online. Many
DIYers rave about using dollar-store bells for incredibly affordable garlands that
still look surprisingly high-end once styled.
Step-by-Step: How to Make a Simple & Inexpensive Jingle Bell Garland
Ready to get crafting? Here’s a straightforward step-by-step method, combining common
techniques from multiple tried-and-true tutorials.
Step 1: Plan Your Length and Look
Decide where your garland is going to live: across a mantel, framing a window, draped
along a staircase, or wrapped around a tree. Measure that area and add an extra 6–12
inches on each end to allow for loops, knots, and a bit of swag.
Then pick your style:
- Minimal: Bells spaced a couple of inches apart on natural twine
- Full and festive: Bells stacked closer together for a chunky look
- Mixed size: A pattern like small–small–medium–small–large for
texture and movement - Layer-ready: A simpler strand designed to sit on top of greenery
Step 2: Cut and Prepare Your String or Wire
Cut your string, twine, or wire to the planned length (plus your extra for loops). Many
crafters recommend cutting the cord about 1.5 times the desired finished length if
you’ll be tying a lot of knots between bells.
If you’re using:
-
String or twine: Wrap a tiny piece of tape around the end to prevent
fraying and make threading easier. -
Wire: Use pliers to bend a small loop on one end. This loop becomes
both a stopper for your first bell and a handy hanging point later.
Step 3: String Your First Jingle Bell
Slide your first bell down to the end of the string or wire. To keep it from wandering:
-
On string: thread the bell on, then tie a tight knot directly above
the loop or hole in the bell. -
On wire: thread the bell, then loop the wire back through the bell a
second time and pull tight to lock it in place.
This first bell acts like an anchor and sets the look for the entire garland, so choose
one of your larger or prettiest bells if you’re using varied sizes.
Step 4: Continue Adding Bells in a Pattern
Now the fun, meditative part: keep threading on bells until your garland reaches the
desired length.
A few pattern ideas drawn from popular tutorials:
-
Classic: One size of bell, equally spaced every 1–2 inches for a
neat, traditional look. -
Old-world charm: Alternate small and large bells for a slightly
irregular, vintage feel. -
Studio-style: Oversized bells spaced out along thick cotton string
for a modern, Scandinavian vibe.
After each bell, either:
- tie a small knot to keep it from sliding around, or
- twist the wire slightly to “lock” the bell in position.
This extra step might feel tedious, but it means your bells won’t all slide to the
middle the first time you hang the garland.
Step 5: Finish the Ends and Add Hanging Loops
Once you’re happy with the length and fullness, secure the last bell just as you did
the firsteither with a knot or an extra wire loop. Then create loops on both ends for
easy hanging:
- On string: tie a small loop and double knot it.
- On wire: bend the end back on itself to form a loop and twist to secure.
If you want a more polished look, tie a short length of ribbon over each loop to
disguise the hardware and add a little extra holiday flair.
Styling Ideas for Your Jingle Bell Garland
The beauty of this project is how versatile it is. Crafters use jingle bell garlands
everywhere, and layering is the secret to that “designer” look.
-
On the mantel: Drape your jingle bell garland over a faux cedar
garland, then add a second layer of beads or rhinestone garland for extra sparkle. -
Along a staircase: Wrap greenery along the banister first, then
layer your bell garland on top, letting the bells hang slightly lower for movement and
sound. -
Across a window: A simple bell strand across a studio or kitchen
window gives a light, airy look and catches every breeze. -
On the Christmas tree: Use jingle bell garland as a secondary layer
over lights and ornaments. Metallic bells reflect the light and make the whole tree
feel more animated. -
As a table runner accent: Lay your garland down the center of the
table on top of a simple linen runner, then tuck in a few sprigs of greenery.
For a very current look, consider pairing your DIY jingle bell garland with brass
garlands or metallic strands like the ones showing up in recent holiday collections.
They add a warm, reflective glow without shedding like traditional evergreen.
Smart Storage and Safety Tips
How to Store Your Garland Without Tangling
Nothing ruins next year’s decorating mood like pulling a knotted metal spaghetti mess
out of the bin. A simple trick many DIYers use:
- Tape one end of the garland to a sturdy piece of cardboard.
- Wrap the garland carefully around the cardboard in neat loops.
- Tape the other end to hold it in place.
This keeps the bells from tangling and protects them from scratches as you pack them
away.
Safety Considerations
-
Small bells are choking hazards. Keep low-hanging garlands out of
reach of toddlers and pets who like to chew on shiny things. -
Avoid blocking vents or heaters. Metal bells can get hot if they’re
too close to heat sources. -
Secure hanging points. Use appropriate hooks or clips so the garland
doesn’t suddenly drop (startling everyone with one dramatic “JINGLE CRASH”).
Troubleshooting Common Jingle Bell Garland Problems
Problem: Bells Slide to the Middle
If all your bells migrate to one spot, you probably skipped the “knot or twist” step.
To fix it, slide each bell where you want it and either tie a knot next to the bell or
give the wire a tiny twist to lock it in place.
Problem: Garland Looks Sparse
Don’t panic. You have options:
- Add more bells in between existing ones.
- Layer your bell garland over greenery or a bead garland for instant fullness.
- Double up two bell strands together and twist lightly.
Problem: It Keeps Falling Down
Lightweight tape and heavy bells are not a love story. Several crafters report better
results using clear clip-style hooks originally meant for string lights. Tie or loop
the garland to the hooks instead of relying on tape alone.
Real-Life DIY Experiences with Jingle Bell Garlands
If you scroll through Hometalk-style projects, Pinterest boards, and crafty Instagram
reels, a few consistent themes pop up about jingle bell garlands: they’re affordable,
addictive, and surprisingly sentimental.
Stretching the Holiday Budget (Without Looking “Cheap”)
Many DIYers start making jingle bell garlands because they want that high-end,
boutique look without the boutique price tag. They’ll see a brass bell garland in a
catalog or on a big retailer’s site, glance at the price, and immediately head for the
dollar store or craft aisle instead.
What’s interesting is how often these “budget” projects end up looking more personal
than the original inspiration. Mixing slightly different bell finishes, tying on bits
of leftover ribbon, or layering the garland with family heirloom ornaments gives a
one-of-a-kind feel no store-bought version can match.
A Kid-Friendly, Memory-Making Project
Jingle bell garlands also show up a lot in family crafting traditions. Because the
steps are simplethread, slide, knotthey’re perfect for kids who are old enough to
handle small parts safely. Parents often report assigning jobs: one child sorts the
bells by color or size, another threads them on, and an adult ties knots and handles
scissors.
The result isn’t just a finished garland; it’s a memory. Every year when the garland
comes out of storage, it carries those “remember when you were little and we made
this?” moments. In a season that can easily get overrun with buying and wrapping, a
simple, shared DIY project can quietly become the part everyone looks forward to.
Apartment-Friendly Holiday Decor
Another group that loves jingle bell garlands? Renters and small-space dwellers.
They’re lightweight, don’t require nails if you use adhesive hooks, and can make a
big impact in tight spacesthink studio apartments, dorms, or compact entryways.
A single strand across a window, layered with a basic greenery garland, can make a
small place feel instantly festive. Because bells don’t take up much visual space, you
can hang them in front of blinds, curtains, or artwork without overwhelming the room.
Evolving the Look Year After Year
One of the most underrated advantages of DIY garlands is how easy they are to update.
Some crafters start with basic silver bells one year, then swap in gold or mixed-metal
bells later as their style changes. Others thread older bell garlands onto new ribbon
or layer them with trendy brass or bead garlands without rebuilding everything from
scratch.
Because the materials are inexpensive, you can experiment without guilt. Try a chunky
layered mantel one year, a minimal Scandinavian look the next, and a whimsical, colorful
version if you end up decorating for kids or themed parties. The core ideaa simple
strand of bellsstays the same, but the styling possibilities are nearly endless.
Why This Project Fits the Hometalk Spirit
At its heart, a jingle bell garland DIY is exactly the kind of project that embodies
the Hometalk mindset: take something approachable, make it your own, and share the
inspiration. You don’t need power tools, a massive budget, or a full workshopjust a
little time, some bells, and a willingness to experiment.
Whether you’re decorating your first apartment, refreshing a long-time family home, or
looking for a cozy craft to do on a December afternoon, this simple and inexpensive
jingle bell garland is a small project with big impact. Once you hear that first
cheerful jingle when you hang it up, you’ll understand why so many DIYers make one
every single year.
Conclusion
Making your own jingle bell garland checks all the holiday boxes: it’s affordable,
approachable, customizable, and deeply festive. With just a handful of bells, some
string or wire, and a bit of patience, you can create a piece of decor that looks
store-bought, sounds magical, and feels personal.
Start simple, follow the steps, and don’t stress about perfectionthe charm is in the
handmade details. Before long, your “I’ll just make one quick garland” may turn into a
whole collection for mantels, windows, staircases, and trees. And honestly? That’s not
a bad holiday tradition to start.