
How to Transform a Plain IKEA Ivar Hack into a Pretty Radiator Cover
Th5
A radiator is one of those hardworking home features that rarely wins a beauty contest. It keeps your room warm, earns its keep all winter, and then sits there looking like a small industrial accordion for the rest of the year. Enter the IKEA IVAR hack: affordable, flexible, solid-pine, and practically begging for a glow-up.
With a little planning, an IKEA IVAR cabinet can become the starting point for a pretty radiator cover that looks custom, adds useful surface space, and helps your room feel more finished. The trick is not simply hiding the radiator. The trick is disguising it while still letting heat move freely. A radiator cover that blocks airflow is like putting a winter coat on your heating system and then wondering why the room feels chilly.
This guide walks through how to transform a plain IKEA IVAR into a stylish radiator cover using smart measuring, safe ventilation, decorative inserts, paint, trim, and practical styling. The result can look like built-in furniture instead of a “please ignore this metal thing” situation.
Why the IKEA IVAR Works So Well for a Radiator Cover Hack
The IKEA IVAR cabinet is popular with DIYers because it is simple, unfinished, and easy to customize. The pine surface can be painted, stained, trimmed, routed, or upgraded with cane webbing, perforated metal, fluted panels, decorative mesh, or fabric-backed inserts. In other words, IVAR is not precious. It is the furniture equivalent of saying, “Sure, cut a hole in me. I believe in your vision.”
The standard IVAR cabinet is roughly 31 inches wide, 12 inches deep, and 33 inches high, making it a useful starting size for smaller radiators or for modular projects where multiple units are joined together. Because the cabinet is made from pine, it has a warmer, more furniture-like feeling than MDF radiator covers. It can lean farmhouse, Scandinavian, vintage, modern, cottage, or “I definitely spent more than I did.”
The Big Safety Note Before You Start
This project is best suited for hot-water or steam radiators, not electric heaters or electric baseboard units. Electric heaters require strict manufacturer clearances and should not be enclosed unless the manufacturer specifically allows it. When in doubt, ask a licensed professional before building anything around a heat source.
If your home was built before 1978, also be careful around old paint on walls, trim, windowsills, and existing radiator covers. Sanding, scraping, or drilling into older painted surfaces can create hazardous lead dust. Use lead-safe practices and hire a certified professional when needed. A beautiful radiator cover is not worth turning your living room into a science experiment with consequences.
Plan First: Measure the Radiator Like You Mean It
Before buying supplies, measure the radiator carefully. Do not measure only the metal body. Measure the widest point, including valves, knobs, pipe connections, and any wall irregularities. Radiators are famous for having one tiny valve that sticks out just enough to ruin your plan.
Take These Measurements
- Width: Measure from the farthest left point to the farthest right point, including valves and pipework.
- Height: Measure from the floor to the highest point of the radiator.
- Depth: Measure from the wall to the front-most part of the radiator.
- Clearance: Add breathing room around the radiator so heat can circulate.
- Access: Make sure valves and bleed points remain reachable after the cover is installed.
A good rule for a DIY radiator cover is to allow at least a couple of inches of clearance above, in front, and around the radiator, with more space where valves need access. Some DIYers add approximately four inches to the width and about two inches to the height and depth. The exact number depends on the radiator, room layout, and cover design, but the principle is simple: air needs a way in, a way through, and a way out.
Design the IVAR Hack Around Airflow
The prettiest radiator cover in the world is a failure if it traps heat inside the cabinet. Radiators warm a room through a combination of radiant heat and convection. When cool air enters low, warms around the radiator, and exits high, the room gets comfortable faster. If the cover blocks that path, your heating system works harder and your toes send a formal complaint.
Use Openings at the Bottom and Top
For an IVAR radiator cover, the front panel should be decorative but open. Cane webbing, perforated metal, decorative radiator grille sheets, rattan panels, or vertical wood slats all work better than a solid cabinet door. The bottom should also have an air gap, and the top should allow warm air to escape. A vented top, slatted top, or raised shelf design is ideal.
If you want a cleaner furniture look, you can keep the top solid but leave generous openings at the front and sides. For better heat movement, consider adding a hidden slot along the back edge of the top or creating a lift-off top panel with discreet spacers.
Keep the Back Open
Most radiator covers should have an open back. The wall already forms the rear boundary, and an open back helps the cover slide around the radiator without trapping unnecessary heat. If the IVAR cabinet has a back panel or bracing that interferes with the radiator, remove or modify it while keeping the structure stable.
Materials and Tools You Will Need
Your exact supply list depends on your design, but this starter list works for a polished IKEA IVAR radiator cover hack.
Materials
- IKEA IVAR cabinet or IVAR components sized to your radiator
- Cane webbing, perforated metal sheet, decorative radiator grille, or wood slats
- 1×2 or 1×3 pine boards for framing and reinforcement
- Wood glue and finish nails or screws
- Primer suitable for wood
- Durable interior paint in satin, semi-gloss, or enamel finish
- Optional heat-resistant paint for areas near high heat
- Fine-grit sandpaper
- Wood filler and caulk
- Decorative trim or molding
- Magnetic catches or small hinges if you want removable access panels
- Reflective radiator panel or foil product for the wall behind the radiator
Tools
- Tape measure
- Pencil and straightedge
- Drill and bits
- Jigsaw or circular saw
- Staple gun for cane or mesh inserts
- Clamps
- Paintbrush and foam roller
- Level
- Stud finder if securing to the wall
- Safety glasses and dust mask
Step-by-Step: Turning IKEA IVAR into a Pretty Radiator Cover
Step 1: Dry-Fit the Cabinet Around the Radiator
Start by assembling the IVAR loosely or positioning the main pieces around the radiator. Do not paint first. You want to discover fit problems before you have a beautifully finished cabinet that refuses to sit against the wall. Check the height, width, depth, valves, pipes, baseboards, and floor slope. Old homes especially love uneven floors. That is part of their charm, by which we mean “bring shims.”
If the IVAR is too narrow, you can use two units or build side extensions with pine boards. If it is too shallow, create a deeper face frame and use the IVAR cabinet as the visible outer shell rather than the entire enclosure.
Step 2: Remove or Modify Solid Doors
A plain IVAR door is attractive, but a solid wood door is not ideal in front of a radiator. Remove the center panel, replace the doors entirely, or build a new front frame. The goal is to create a breathable front that looks intentional.
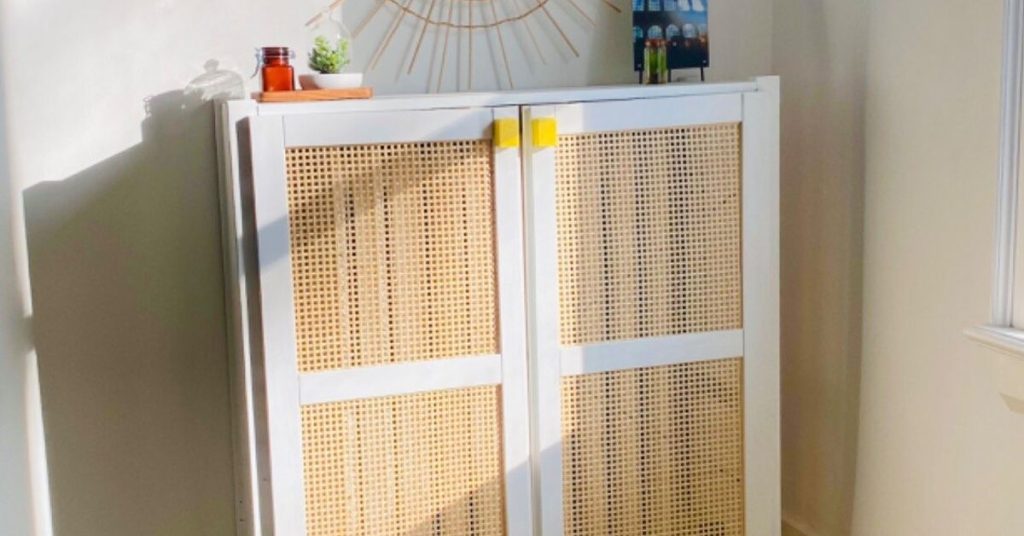
For a classic look, cut out the center of each door and staple cane webbing to the inside. For a modern look, use perforated metal. For a minimalist Scandinavian look, build a front from evenly spaced vertical slats. Keep the openings large enough for airflow; tiny decorative holes may look cute but perform like a sweater over a toaster.
Step 3: Build a Strong Face Frame
A face frame makes the radiator cover look built-in and hides raw cuts. Use pine boards to create a front frame that fits around the radiator opening. Attach it to the IVAR body with screws and wood glue. If you are using cane or metal mesh, sandwich the insert between the frame and a thin retaining strip so it stays flat and neat.
Make sure at least one section is removable or hinged if you need access to valves. A magnetic removable panel is a smart solution because it preserves the clean look while keeping maintenance simple.
Step 4: Add Ventilation at the Top
Warm air rises, so the top of your cover needs a plan. You can cut a long vent slot near the wall, use a decorative grille on the top surface, or install the top as a shelf raised slightly above the side supports. If you want a usable shelf, keep it light-duty and heat-aware. Avoid storing candles, electronics, delicate plants, or anything that dislikes warmth.
A simple trick is to create a narrow shadow gap under the top board. From the front, it looks like a clean furniture detail. Functionally, it gives warm air a place to escape.
Step 5: Sand, Prime, and Paint for a Built-In Finish
IVAR’s unfinished pine is easier to paint than glossy laminate, but prep still matters. Sand the surface smooth, remove dust, apply primer, and use thin coats of paint. Satin or semi-gloss finishes are practical because they are easier to wipe clean. If the radiator gets very hot, choose products appropriate for warm areas and avoid finishes that may soften, yellow, or smell when heated.
For a custom look, paint the radiator cover the same color as the wall or trim. Matching the wall makes it disappear; matching the trim makes it look architectural. For a bolder style, try deep olive, navy, oxblood, warm taupe, muted terracotta, or creamy mushroom. Yes, “mushroom” is a color now. Interior design has made peace with vegetables.
Step 6: Add Trim for the “Was This Custom?” Effect
Trim is where the magic happens. Add slim molding around the front opening, a small baseboard-style plinth at the bottom, or a beveled edge under the top shelf. Caulk seams where pieces meet, fill nail holes, and sand lightly before the final coat of paint.
If your home has traditional molding, echo that shape. If your space is modern, use flat stock and crisp lines. The goal is not to make the IVAR unrecognizable; the goal is to make it look like it belongs to the room.
Step 7: Install a Reflective Panel Behind the Radiator
A reflective radiator panel behind the unit can help reduce heat loss through an exterior wall and redirect more warmth into the room. It is especially useful in older homes with less insulation. Choose a purpose-made radiator reflector rather than kitchen foil, and install it according to the product directions.
This is one of those small details nobody sees, but your heating bill may appreciate the effort. Think of it as giving your radiator a tiny motivational mirror.
Style Ideas for a Pretty IKEA IVAR Radiator Cover
1. Cane Webbing for a Soft Vintage Look
Cane webbing pairs beautifully with IVAR’s natural pine. Paint the frame creamy white, soft beige, or sage green and let the cane add texture. This works especially well in bedrooms, nurseries, and older apartments with vintage charm.
2. Perforated Metal for Better Heat Flow
Perforated metal is a practical choice because it is durable, heat-friendly, and available in many patterns. Paint it the same color as the frame for a seamless look or choose brass, black, or bronze for contrast.
3. Vertical Slats for a Scandinavian Finish
Vertical wood slats are simple, modern, and easy to customize. Leave narrow gaps between slats for airflow. This style looks especially good when stained instead of painted, giving the radiator cover a warm furniture feel.
4. Wall-Color Paint for a Built-In Illusion
Painting the cover the same color as the wall makes the radiator visually recede. This is ideal for small rooms where too many contrasting furniture pieces can feel busy.
5. A Console-Style Top Shelf
A radiator cover can create a slim display ledge for framed art, a ceramic bowl, or a small stack of books. Keep decor minimal and avoid blocking top vents. A radiator cover should not become a clutter runway.
Common Mistakes to Avoid
Blocking the Airflow
The biggest mistake is building a beautiful box with no ventilation. The front, bottom, and top all need some level of openness. Heat must move, or the room will not warm efficiently.
Forgetting Valve Access
Radiators need occasional attention. If your cover traps the valve behind permanent trim, future you will not be impressed. Add a removable side panel, hinged front, or hidden access door.
Using the Wrong Finish
Cheap paint can peel, yellow, or stay tacky near heat. Use quality primer and durable interior paint. Let finishes cure fully before exposing the cover to regular heat.
Ignoring Old-House Hazards
Older homes may contain lead paint or brittle plaster. Do not sand mystery paint or disturb old surfaces casually. Test, contain dust, and hire professionals when needed.
Making the Cover Too Tight
A snug fit may look sleek, but radiators need space. Leave enough clearance for heat movement, cleaning, and maintenance. A little extra breathing room is better than a cover that acts like a heat prison.
Budget Breakdown: What This IKEA IVAR Hack Might Cost
The cost depends on the size of the radiator and the finish you choose. A basic version using one IVAR cabinet, paint, primer, and simple slats may stay relatively budget-friendly. A more decorative version with cane webbing, metal grille, trim, specialty paint, and hardware will cost more but still often comes in below a fully custom radiator cover.
To save money, use leftover wall paint, choose affordable pine trim, and keep the design simple. Spend where it matters: ventilation, stable construction, and a smooth finish. Fancy hardware is nice, but a cover that opens properly and does not trap heat is nicer.
Real-Life Experience: What I Learned from Making an IKEA IVAR Radiator Cover Look Pretty
The first lesson is that the radiator always looks smaller until you try to build around it. Standing in the room, you may think, “Oh, this little thing will fit easily.” Then the tape measure reveals a valve sticking out on one side, a pipe elbow on the other, and a baseboard that refuses to cooperate. Measure twice is good advice. Measure while crouching, squinting, and checking the pipe behind the radiator is even better advice.
The second lesson is that ventilation can be stylish. At first, it is tempting to hide everything behind solid doors because solid doors look clean. But once you start exploring cane, mesh, and slats, the breathable parts become the design feature. Cane gives a room softness. Metal grille adds polish. Slats look custom and modern. The radiator cover stops being camouflage and becomes furniture.
The third lesson is that paint changes everything. Unfinished IVAR pine can look like a storage-room cabinet before paint. After primer, sanding, caulk, and two careful coats, it can suddenly look like built-in millwork. The tiny details matter: filling screw holes, sanding between coats, and painting the inside edges of cutouts. Those are the things that separate “weekend hack” from “please admire my craftsmanship while I pretend this was easy.”
The fourth lesson is to keep the top surface simple. A radiator cover creates a tempting shelf, and shelves attract clutter the way socks attract dryer portals. A framed print, a tray, and maybe one heat-tolerant decorative object are enough. Avoid candles, electronics, wax-based decor, delicate plants, or anything that may warp, melt, dry out, or complain silently.
The fifth lesson is that access panels are not optional. Radiators have valves. Valves like to be reached. If you build a perfect fixed front and later need to bleed the radiator or adjust the valve, you will discover a new emotion: decorative regret. A magnetic panel, removable grille, or hinged side door keeps the project practical.
The final lesson is that an IKEA IVAR radiator cover works best when it respects both design and function. The goal is not to defeat the radiator. The goal is to give it a nicer outfit. Keep the air moving, keep the finish durable, and keep the style connected to the room. Do that, and your once-plain radiator can become a polished focal point instead of the awkward metal guest who never leaves.
Conclusion
An IKEA IVAR radiator cover hack is a clever way to turn a plain heating fixture into something warm, pretty, and practical. By measuring carefully, leaving proper airflow, using breathable inserts, and finishing the piece with paint and trim, you can create a radiator cover that looks custom without requiring a custom-furniture budget.
The best version is not just attractive; it is thoughtful. It allows heat to circulate, keeps valves accessible, avoids unsafe materials, and works with the style of the room. Whether you choose cane webbing, perforated metal, vertical slats, or a painted built-in look, the IVAR gives you a flexible foundation for a radiator cover that feels charming instead of clunky.
